Online Manual
What is Aika Reliquary?
Aika Reliquary is a desktop application that reads game files from T3Fun's Free-To-Play MMMO, Aika Online. The data available is broken down into categories and sub-categories for easy browsing.Prerequisites
This program was written in Microsoft Visual Studio 2013 and requires Microsoft .Net Framework 4.0 Full. To pull the ingame images also requires Microsoft DirectX 9.0c (otherwise known as Managed DirectX). This program was made for Windows Vista and up (best viewed and most recommended in Windows 7). And last but not least Aika itself (t3fun.com)Installation
As with all DogSkull Software programs, there is no installer. The executable can be placed anywhere you like and any files that are needed will be created at first run. If any prerequiste files are needed, a prompt will appear letting you download and install on the fly (program restart required, OS restart more than likely)Getting Started
After downloading the file from the site (www.dogskullsoftware.com/?program=Reliquary) (see this on download safety) you can move the file anywhere on your system and then execute. To start, Reliquary will create a config file for the exe and setup some defaults. After the splash screen first appears, it will check with dogskullsoftware.com to ensure you're using the most up to date version. Then it does checks to make sure .Net 4.0 and DirectX 9.0c are installed. It then senses the Aika installation folder and finds the files it needs. If any of these steps don't happen as expected, Reliquary will alert you with message boxes with how to fix the problem.UI Introduction
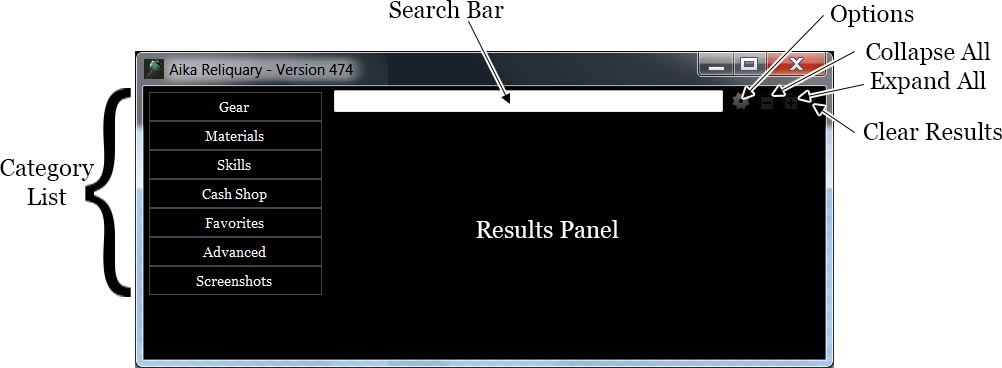
Once the splash screen finishes the main window will appear. On the left, a collapsable heirarchy of categories. The top is the search and tool bar. The main body is for result display. At this stage the Aika database is fully loaded in memory and ready for you search parameters. The title bar will display the Aika database version which gets updated every week by T3fun.
Search Bar
Located at the top, the search bar allows you to quickly view an entry as long as you know the name. As you type, the results will show beneath the Search Bar; clicking one will load it in the main body. If you have Advanced Search checked in the options, the results will include the entire database.
Options
These options are present in the case that major updates occur. Reinforcement Max: This is the highest possible reinforcement value of equipment (as of this document the default is 12). Enchantment Multiplier: A recent update changed the behavor of enchantment crystals. Movespeed 2's became Movespeed 4's, etc. This multiplier is applied only to enchantments. (as of this document the default is 2); Level Cap: Current character level cap (as of this document the default is 90). Pran Level Cap: Current pran level cap (as of this document the default is 70). Results Per Page: Number of entries to load per page. If your system hangs or slows to a crawl on category selection, reducing this number may help to increase performance (default is 100). Advanced Search: If this is checked, the search bar will include the entire database instead of equipment entries (default unchecked). Clear Favorites button: Clears all Favorites. Aika Path: Changes the path to find Aika files. Changing this path will require the program to restart. You should only change this if Reliquary is pointing to an invalid path. Save button writes any changes; closing the window disreguards changes.
Expand/Collapse All Buttons
These buttons become available only when there are entries to display. Expand All will expand all entries shown, as Collapse all will collapse them. In Screenshot mode, these buttons act as a thumbnail zoom.
Clear All
Clear All will remove all entries that are not pinned. This is mainly used to remove unwanted (un-pinned) entries, allowing a cleaner view of what you want to see. Right-clicking this button removes everything, including pinned entries.
Category Pane
The left hand list consists of 3 main categories: Gear, Materials and Skills. The favorites is a user defined query. Clicking the Gear button displays the 6 main classes in the game as well as Accessories and Pran. Clicking on a player class reveals subcategories for that player class: Weapon, Armor, Gloves, Boots, Helmet, and Shield (Paladin only). Beneath that a list of Level ranges and beneath that Sets, Mount, and Recipes. The rest is fairly obvious. Clicking on any of these will generate all the relevant Gear (based on the class chosen). Note that items that aren't currently "in-game" will also appear here; a bit of a behind the scenes look at some of the things forgotten or upcoming.Results Pane
After the query is complete, the main body will fill with relevant results. Each item in this list is referred to as an 'entry'. Mousing over the icon for each entry displays a tooltip closely emulating what you would see in the actual game. Next to the icon the class and level requirements. If the item can be crafted either by the anvil or a DIY, the ingredients and quantites will cascade on the entry. You can mouse over these icons as well for the appropriate tooltip. At the extreme right of each entry are two icons; the pushpin and favorite. Any entry pushpinned will remain in the body even when cleared. Favoriting an entry makes it available in your Favorites query in then Category Pane. Clicking on the entry will cause it to expand revealing more information about the item.
Items
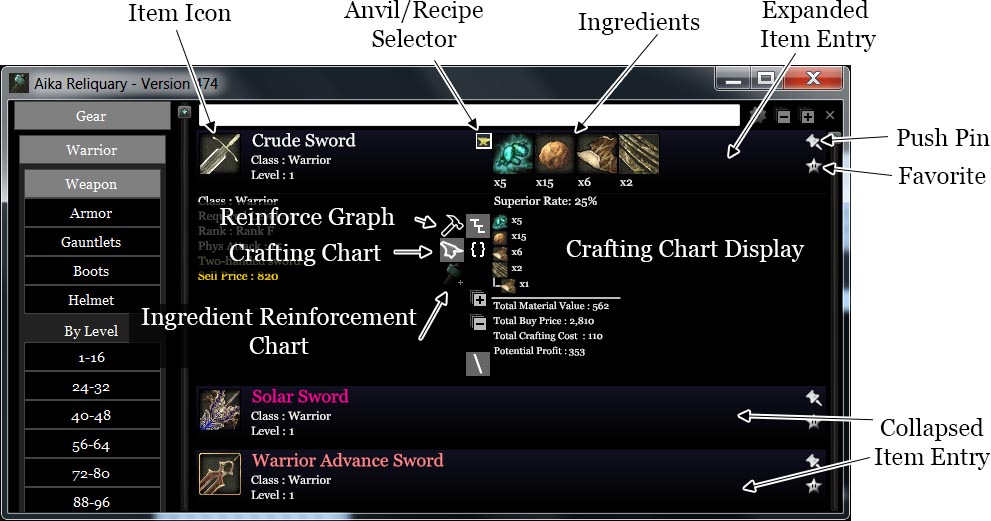
This includes everything contained in Gear and Materials categories. If the item entry has DIY and/or anvil recipes, a list of ingredients will cascade after the item icon and name. Just before this cascading list, small icons run vertically that denote the type of recipe. This is called the Recipe Selector. Most entries only have 1 way of crafting, however there are some rare cases that have 4 ways of crafting and those methods can be browsed with the Recipe Selector. Changing the source recipe also updates the crafting chart (more on this later). Mouse over these icons to get more information about the infgredients/recipes. And finally, to the far right, are 2 toggles; Push-pin and Favorite, respectively. Toggle the Push-pin on prevents it from clearing. You can Push-pin items to compare, click the Clear All button to remove all other entries for a cleaner view. For example, if you are comparing warrior swords, simply Push-pin the relevant entries, click the Clear All button and now your results will only show thos entries that have been Push-pinned. Beneath the Push-pin is the Favorite toggle. Toggled Favorites can be viewed with the Favorites category button. Next, let's explore expanding Item Entries
Translate Korean
Some entries, especially unused/abandoned/forthcoming entries, aren't localized into english text. Right-clicking the entry will bring up a Translate menu. Clicking this menu will open Google Translate in your default web browser. Note that the accuracy of the translation is dependant on Google Translate so translation errors are possible.
Expanding Item Entries
Clicking the item icon will toggle expanded mode. In an expanded entry, directly below the icon will display more-or-less the same information as the tooltip. Beneath the ingredient cascade 3 different types of information may be displayed depending upon the item. If the item can be crafted (in any way) the Crafting Chart will appear, if the item can be reinforced the Reinforcement Graph will appear, if the ingredients require an item that can be reinforced a Crafting Reinforcement Chart will appear, and if the item doesn't meet any of these criteria the area will be blank. Three icons appear that represent the three different views. Note that not all items will have all of these icons enabled.Reinforcement Graph
Only items that can be reinforced will have this option enabled. The chart that is displayed is known as the Reinforcement Graph. From left to right it graphs the effects of reinforcing gear to it's max potiential. The multi-colored gradient represents the success rate for reinforcement and the numbers that run along the top refer to the reinforcement level. Mousing over this chart will tooltip information based on that level of reinforcement. Above this list is the reinforcement cost used per attempt at reinforcement. To the top-left of this list, is the Zoom button. Clicking this zooms the chart so that it's maximum values represents the entire graph. The default behavior is the graph icon below the Zoom button. This button is one of three different types of scaling. The first is Equpiment Type Scaling; the chart is scaled based on the character class and equipment type of the item. So, if viewing a rifleman cap, for example, the chart would scale to the largest defense found in helmets only for rifleman. The next graph icon is the Character Type Scaling button; the chart is scaled based on the character class only. Using the previous example, the chart would be scaled to the largest defense found in helmets for all classes, independant of the current character class. Lastly, the Everything Scaling button, scales the graph to the max values possible. Again, the example would be scaled to the largest defense found for all equipment, independant of character class or equipment type. The space between the gray lines that run horizontally in the graph, represent the scaling. Closely spaced lines represent small graniularity, while large gaps represent larger granularity; or, better put, more 'zoomed-in'. At the opposite side of the graph are the Legend and Success Line Toggle buttons, which should speak for themselves.
Crafting Chart
For items that can be crafted, the Crafting Chart becomes enabled. This is a tree-view of all the ingredients needed to satisfy the recipe with quantites. Items in this view that can also be crafted will branch out to show the neccessary items needed to craft it, and etc. Note that branched items include not only Anvil recipes, but DIY's as well, so be aware that some DIY-crafted items are near impossible to craft sometimes because of the rarity of some of the DIY's in game. Also, these branches' quantities will be multiplied by the parent of the branch. Example, if you need 6 Enriched Caelium, the tree will branch to show you need 36 Caelium (amongst other things) to craft the appropriate amount of Enriched Caelium. Collapsing a branch by clicking on it's parent signals the program that you do not intend to craft those ingredients individually. This chart will wrap, sometimes several times, until it finally terminates and writes some extra data signified by a white, horizontal line. The first thing is the Total Material Value. This is the amount of gold (before taxes) you would've recieved if you NPC'ed the mats instead of consuming them. Next is the Total Buy price. This is a theroritcal price of the cost of buying all the mats individually from a NPC. Obviously not all mats can be purchased in this fashion, so this number is just there to give you a sence of how much the value of the mats are. If a '+' is present, that indicates shop costs that you must also pay, such as buying items from the blacksmith that are not mob drops like Glues and Epoxies, etc. Next is Total Crafting cost; this is how much gold you will need to craft all the mats at the Anvil, paying the Crafting Fee. Last is the Potential Profit; this calculates all the above numbers and gives you a theroretical sum (profit or loss) of crafting this item. If the Value of all the mats is less than the Value of the item, the number will be negative (and red) showing the amount of gold lost in crafting this instead of selling the mats off indvidually. Of course, it gets the item value by the NPC buying price, in actuality you should be selling your crafted items much higher than the NPC's would buy it. Using the absolute value of this number could indicate the lowest price you should sell in order to break even. So if your Profit is -20k, you should auction that item for at least 20k in order to get your money back, auctioning for even higher would result in a positive gain, i.e., profits. To the left of this chart are the chart filters. The first is the default, showing of sub-trees. The second is Total Ingredient Quantities (represented by curly brackets { }). This condenses the list down show how much of each ingredient needed including sub-trees. Collapsing trees in the Sub-Tree View will change the values in this list. Below that button are the Collapse/Expand All buttons. Only for Sub-Tree View, this simple expands or collapses all tree's in the view. Last is Show Root Lines, which again only works in Sub-Tree View, removing the lines shown to help with readability.
Ingredient Reinforcement Chart
This option is only enabled if the recipe includes an item whose reinforcement level changes the success rate of the recipe. Clicking the chart changes the ingredient's reinforcement level, thus changing the success rate. The multicolored columns represent the success rate of the recipe in relation to the reinforcement level. Mouse-over the chart for more information.
Skills
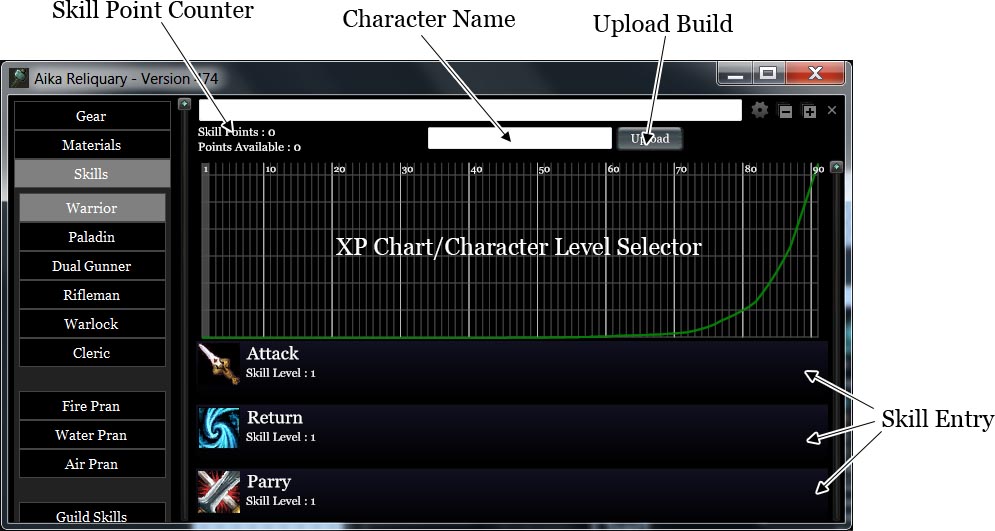
Skill entries work similar to the Item entries. These entries include Class Skills, Pran Skills, and Guild Skills found in the Skill category. Choosing a Skill entry will also include an EXP Chart.
EXP Chart
This chart represents the experience points needed at each character level. Mousing over this list will show you the amount of XP needed for that level. Clicking this chart acts as setting the character level of the class chosen. Setting the character level also awards you skill points to be used for the Skill Entries found below.
Skill Entry
Note that much like the Item Entries, Skill Entries also contain artifacts of abandonded/forthcoming code. The skill icon is displayed next to the skill name and under that the currently selected skill level of that skll. Expanding the Entry, by clicking it, shows the Skill Info Chart. This works much the same as the EXP Chart; clicking this sets the skill level and uses skill points accumulated by the currently selected Character Level. The lines on this graph differ from skill to skill. A small legend-listing on the right as well as the mouse-over tooltip will show you how the skill changes with each level up. Additional information (like Range) is also included in the tooltip even though that data isn't given to you in the game.
Player Builds (user-submissions)
At the top of the EXP Chart is a textbox and a pushbutton labeled 'Upload'. These are the controls for uploading user player builds. By setting your level, choosing your characters skill-set, and inputting your characters name in the textbox, clicking Upload, you have successfully shared your build with other users of Aika Reliquary. The list of user-submissions can be found in Skills->Player Builds.
Advanced
This gives the option of viewing database objects that don't quite fit into the regular criteria. Select an option from the dropdown and the results appear as you'd expect. Note: Diving into the depths of Aika database may cause errors in the program as this is not Aika Reliquary's true purpose.
Screenshots
Taking from your Aika install directory, Screenshots will show all the files in your games Screenshot path. Use the Expand/Collapse All buttons to change the size of the thumbnails. Clicking an entry will open the image using your system's default editor. Right-clicking will show more options to Delete or open the folder in windows.
Notes
If the Aika database gets updated while this program is running, you may get a messagebox to restart the program and reload the new values. Everytime you run this program it does a quick check with the DogSkull servers for any updates. If one is found, you will be given the option to update and read the latest changelog. It is highly recomended that you update immediately.